Drawing For Kids For many years, the superhero Black Panther has appeared in various forms. Although he has always been a well-liked figure, recent film roles have propelled him into superstardom and gained him fans worldwide.
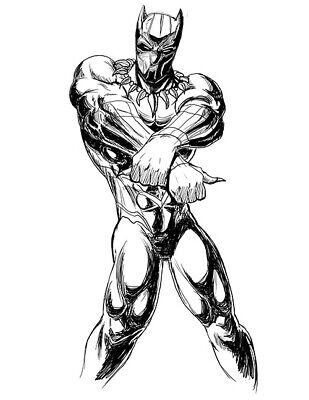
Black Panther Drawing
Drawing For Kids might be a terrific way to express your admiration for this character. Learn to draw Black Panther, but it can also be more challenging than you might think.
It can be made much simpler to perform if you have a guide to divide it into smaller sections. This manual is ideal for achieving that goal!
This step-by-step tutorial on how to draw Black Panther in only 6 simple stages is one we hope you’ll find useful.
Step By Step Drawing Tutorial
Let’s Start Drawing the Black Panther!
1:
- Black Panther is a complicated character to draw, more so than one may imagine.
- There are many other elements to make, but it’s also important to get genuine human body proportions. We will take it carefully and move forward to ensure it doesn’t become too challenging.
- We’ll concentrate on his head and the beginning of his arms in this first step. Draw the outline of his head and face using the reference photo as a guide, including the two pointed ears.
- The outlines for his shoulders and arms will be started using more rounded lines, to which we will add more detail in subsequent sections.
2:
- Draw more of his arms and details after that.
- As we continue with your Black Panther drawing, we will add more to the arms and some additional body and head detailing.
- Begin by completing the left arm. The hand at the end of this arm will have claws on the tips of the fingers.
- The next step is to add some finishing touches to the image, and this is where things might become a little tough. The reference image can guide you as you add the line detail throughout Black Panther’s clothing.
- Before continuing, we will also add his eyes and his pointed necklace.
3:
- In this step, draw the beginning of his legs.
- You may concentrate on the lower part of the body for this phase of our tutorial on drawing Black Panther now that you have finished top of the drawing.
- This section will pay particular attention to his legs’ beginnings.
- Start by sketching the contours of his legs. After those are complete, add identical line and contour features to those you added in step 2.
4:
- Draw his first foot now.
- This section of your Black Panther drawing aims to complete the first leg. All you have to do for this phase is draw his boot using curved lines.
- Then, after that is drawn, we will add comparable line details to the top and middle of it, as seen in the reference picture.
- Again, these particulars will resemble the details we’ve included in the picture.
- Then, we need to add a few minor finishing touches in the following stage, so let’s get to that part!
5:
- Complete the drawing of the Black Panther in its final details.
- There are only a few blank places left to fill in this part of our tutorial on how to draw Black Panther, and your drawing is almost finished.
- The remaining portions of his arm and leg are depicted on the drawing’s right side. These can be added with the same shading, detailing, and outlining methods as the rest of the image.
- After ensuring every last element is present and accounted for, your drawing is complete! You can add a few more finishing touches before we add the colours in the following section.
- You may include many details; this is where you can use your imagination and have fun.
- To complete the idea of the picture, you might add a background or any of your other favourite superheroes to go with him.
- What other suggestions can you come up with to complete the picture? These are just a few things you may attempt.
6:
- Add colour to the drawing of the Black Panther to complete it.
- In this last part of this Black Panther drawing, you can enjoy playing with colour and enhancing your painting.
- Even if Black Panther isn’t the most colourful figure ever, you may still use some black and grey for his attire and other features.
- You can use brighter colours in the background or with any extra details and pieces you may have added, even if you stay with his more subdued colour scheme.
- What hues, media, and artistic styles do you believe will best complement this fantastic Black Panther image of yours?
4 Additional Techniques To Make Your Black Panther Drawing Special
- Use these suggestions to save the day and improve your Black Panther parody.
- Black Panther is seen in this drawing wearing his traditional attire inspired by books and movies.
- But you could portray a few of his various looks over his career.
- You could modify your favourite Black Panther pose to fit the one we came up with if you have one from the comics or other media.
- This would help to tailor it to your preferences and might come from any source you choose.